")
")
")
The most important factor for a clean laser show display is a good white balance.
White balancing a laser projector can be perfected up to ca. 90%, as various factors influence on the accuracy.+
- The type of laser:
Older DPSS systems, which are sometimes not temperature stabilized, can already change their behaviour on small temperature changes
- Linearity of the laser:
Often the driver electronics cannot provide a super linear power and power curve. Exception are very high quality Diode or OPLS drivers, e.g. of RTI
- Power ratio:
Depending on the power levels of each color a more the intensity levels require different balancing.
White balance in the end is a subjective thing and depends on the spectator, especially in terms of "what is white".
Showcontroller comes with a test picture called JM Colortestpic.pic .
Open this picture in PicEdit: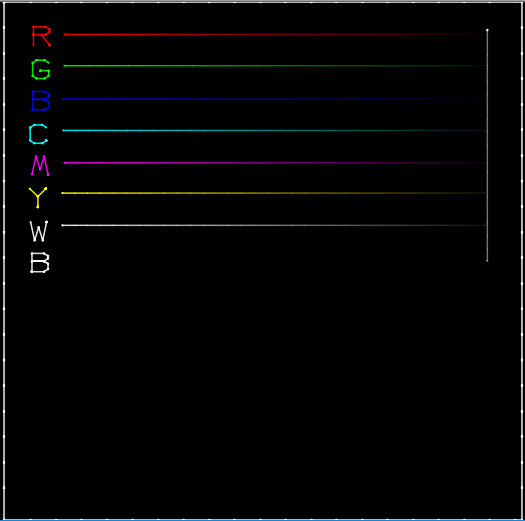
On first sight, the white outter frame is visible. Inside of this outter frame there are severalö color lines. Each line consists of 32 color steps. It is normal that this test picture can flicker at a scan speed of 25kpps.The values of each point span from right (0) to left (255) in 8-bit resolution. This means 32 values in the modulation spectrum 0 - 5V DC at the laser driver.
If everything was perfect, the output would look exactly like the picture above. However, in reality white often is blueish and the color lines do not reach to the right limiting line.
So first of all it is necessary to adjust the output curves per DAC. Showcontroller creates one settings file per hardware interface called "interface_name.jmi". This file is overwritten on closing the program. Therefore it is important to make sure that only PicEdit is opened during making these settings, otherwise they may not be preserved.
Click on this icon ![]() to switch to the Control Center:
to switch to the Control Center: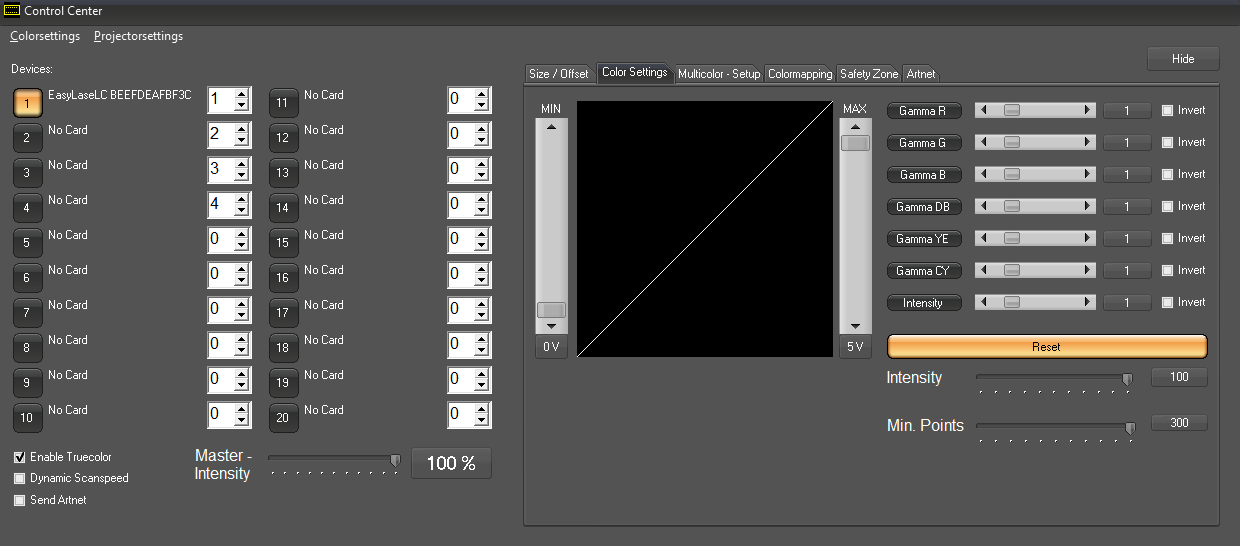
At least one interface should be shown in the left part of this window, in this case the EasyLase LC. The adjustments are made in the right part of this window in the tab "Color Settings".
If there are more than one cards recognized, select the very card to be adjusted first with a click on the device number.
White Balance
Usually laser systems tend to have a surplus on blue. The optical reference for the adjustments as the white outter frame.
Select the color to be adjusted by clicking on the respective "Gamma" button in the right part of the window and adjust the maximum color values by moving the max-fader. Assuming that red is the weakest color (as an example here), it makes sense to first match a clear yellow. To do so, click Gamma B and reduce the MAX fader to 0. Then select Gamma G and reduce green with the MAX fader until a clean yellow becomes visible. Then select gamma B again and add as much blue as is required to make the outter frame actually look white.
The generated color curve can e.g. look like this: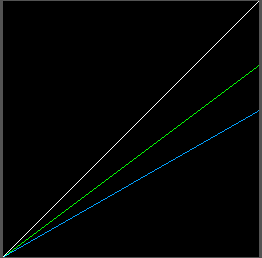
In this case, blue has been reduced to 55% and green to 80%. In this case, blue has been reduced to 55% and green to 80%.
The projected outter frame now shows in the color subjectively specified as white. The individual color lines, however, do not reach the right border. This results from the offset not bein set correctly yet. Many lasers require a minimum power (often referred to as threshold) for being able to start with outputting.
Setting the Offset
Settings are conducted wrom red to blue. Click on the matching Gamma button and increase the "Min" Fader. As soon as connection lines become visible, the setting is 0.3V too high. The values are displayed below the faders.
Increase all Min-values until the color lines reach the right border.
The color curve could look like this now (depending on the drivers):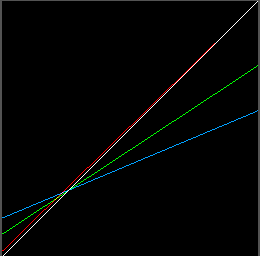
Red has the smallest offset, green a bit more and blue the most in above shown case .Red has the smallest offset, green a bit more and blue the most in above shown case .
Adjust color linearity
Minimuma and maximum values have been adjusted, but the color linearity has still to be adjusted individually. Perfectly adjusted colors should show a homogenous color dimming behavior when the overall brightness is reduced, which means that the color lines should fade out homogenously on reducing the master brightness.
In most cases it is necessary to bend the color curved a bit, so the color curve is steeper at the beginning and smoothens to the end. The respective color line should show a linear color gradient from 0 - 100%.
These color curves can be adjuste with using the horizontal faders right of the Gamma buttons. By adjusting these fader different options are possible - it requires trying the very effect. Potentially the Min values require minor adjustments after the color linearity has been set properly.
In our example it is likely that the color green will fade out quicker on reducing overall power than the other colors.
So this requires adjustments in the upper part. The curve could then look like this: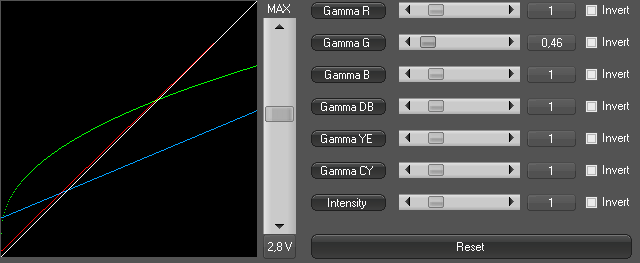
The green Gamma fader has been slightly set to left. The shape of the color cuve gives an impression of the actual impact on the output: The current is reduced slower the higher the power.
Again reduce the intensity fader from 100% to 0% intensity and monitor the laser output. Repeat until all lines fade out as homogenously as possible and so does the white outter frame.
This means: it becomes darker and darker, but without any color deviation - it stays "white".
If the dimmint down to 15% or 20% works out well, the adjustment should be sufficient. It is very difficult to modulate a high power, e.g. 10W, laser in lower power ranges.
However, the white balancing is extremely important for professional laser output results. With a bit of experience it is usually done within several minutes.
Select your language